
Geometric Pattern Design for Beginners: Geometry is everywhere. Honeycombs, snowflakes, the tiles under your feet—patterns shape how we see and organize the world. I’ve spent twelve years designing geometric patterns, from hand-painted murals to digital layouts, and I’m still amazed when a simple grid completely changes a room’s energy.
Here’s the truth about geometric pattern design for beginners: it looks harder than it is. You’ve walked past these patterns your whole life. You just didn’t know what to refer to them as nor how they worked.
Quick Reference: The 5 Essential Patterns
Linear Grid: Multiple intersecting lines forming equal squares or rectangles.Other possible web page designs:
Herringbone: V-shaped weaving with angled rectangles for flow.
Tessellation: Shapes that fit together without spaces.
Radial Balance: Elements that radiate outwards from a center point, similar to the sun’s rays.
Fractal: It is self-repeating, or parts resemble the whole.
The Psychology of Shapes: Geometric Pattern Design for Beginners
Circle-filled rooms feel different than triangle-heavy spaces. This isn’t abstract theory—it’s neuroscience.
Circles signal safety. Community. Wholeness. We sit in circles for difficult conversations. We exchange rings for commitment. Triangles work opposite. They point. They create tension. They say something’s about to happen.
My first nursery design had triangular patterns everywhere. Sharp, modern, bold. The parents loved the photos. But their baby wouldn’t settle. We repainted half the triangles into softer curves, and the kid started sleeping better within a week. Sometimes your brain knows what it needs before you do.
The Ease of Sight
Your eyes get exhausted when they work too hard. I see this mistake constantly—someone discovers patterns and throws four different ones into the same room. Individually beautiful. Together? Visual chaos.
Geometric pattern design for beginners succeeds through symmetry. Repeating patterns let your eyes relax. They know what’s coming. This is why I tell everyone to start simple. Make the pattern obvious. Give eyes somewhere to rest.
Pattern Comparison: Choose Your Starting Point
| Pattern | Difficulty | Primary Mood | Best Use Case |
| Linear Grid | 1/10 | Stability & Order | Gallery walls, modern layouts |
| Herringbone | 4/10 | Energy & Movement | Hallways, flooring, backsplashes |
| Tessellation | 6/10 | Efficiency & Unity | Tiling, intricate DIY crafts |
| Radial Balance | 5/10 | Focus & Power | Statement rugs, ceiling medallions |
| Fractal | 7/10 | Calm & Depth | Feature art, stress-relief spaces |
Pattern 1: The Linear Grid (The Foundation): Geometric Pattern Design for Beginners
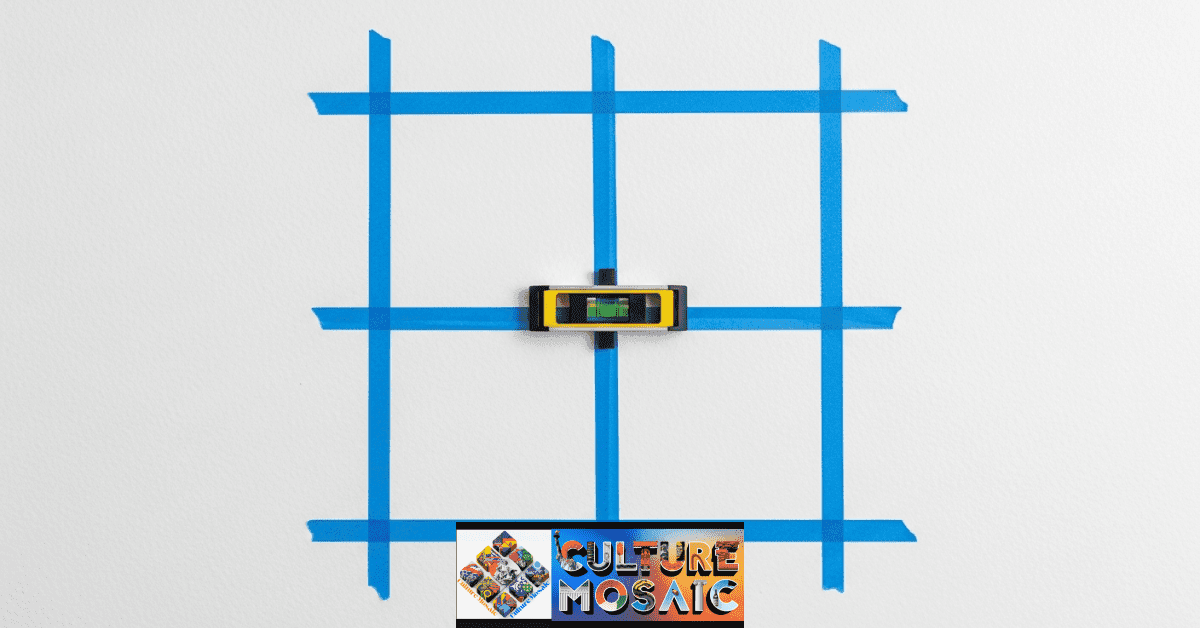
Difficulty Score: 1/10
Definition: Intersecting vertical and horizontal lines creating equal squares or rectangles.
Every designer I know started here. I still use grids more than any other pattern because they’re reliable, versatile, and nearly impossible to screw up.
The Concept
Grids divide space into equal sections. Your Instagram feed is a grid. Checkerboard floors are grids. Gallery walls with evenly spaced frames—grids. The pattern creates what I think of as visual refuge. Everything has a place. Nothing competes for attention.
I use grids for overwhelmed clients. Equal spacing and straight lines calm people down. It’s predictable, and predictable feels safe.
The Beginner Hack
Skip the expensive laser level. I’ve made hundreds of perfect grids with painter’s tape and a $12 bubble level.
Measure your space. Pick a grid size—I default to 12-inch squares for walls because they’re visible but not overwhelming. Level that first horizontal line perfectly. Everything builds from there.
Furniture projects? Sketch the grid on paper first. Test proportions small before you commit. I once painted a dresser without sketching first. The grid squares looked cartoonishly huge. I had to sand it down and start over. Sketch first. Always.
Grids eliminate decision fatigue. The pattern tells you where things go. No guessing. No second-guessing.
Pattern 2: The Herringbone (The Movement)

Difficulty Score: 4/10
Definition: V-shaped weaving created by placing rectangles at 45 or 90-degree angles to each other.
Grids are stable. Herringbone is dynamic. This pattern adds energy without losing control, which makes it perfect for geometric pattern design for beginners who want something less static.
The Concept
Herringbone makes that distinctive V-shaped weave. Each piece angles toward its neighbor—typically 45 or 90 degrees. It looks complicated. It follows one simple rule: maintain the angle.
I’ve used herringbone on floors, walls, backsplashes, quilts. It works everywhere because it’s visually interesting but still structured.
The Visual Trick
Herringbone lies about your room’s dimensions. That’s its superpower.
Client had a narrow hallway. Felt like a bowling alley. We put herringbone flooring running lengthwise, and the space instantly felt wider. The diagonal lines create visual width. Your brain sees the outward movement and reads the space as broader than it measures.
Works vertically too. Low-ceiling basement? Vertical herringbone makes it feel taller. I’ve gained six perceived inches of height with this trick. The upward diagonal movement pulls your eye up.
Start small. Accent wall. Small backsplash. Get comfortable maintaining consistent angles before you tackle a whole floor. The angle consistency matters more than you think.
Pattern 3: The Tessellation (The Infinite)
Difficulty Score: 6/10
Definition: Complementary shapes perfectly joined in pairs without space or repetition.
Tessellations are where geometric pattern design for beginners starts feeling professional. These patterns lock together with zero waste space.
The Concept
Picture honeycomb. Those hexagons fit so precisely the pattern could extend forever. That’s tessellation. Works with triangles, squares, complex shapes. The requirement: edges align perfectly.
I spent three weeks tessellating my kitchen backsplash. My partner kept asking when I’d finish. I kept saying “one more row.” Watching shapes lock together does something to your brain. It’s meditative. Satisfying. Possibly addictive.
The Biophilic Link
Bees use hexagons for efficiency, not aesthetics. Hexagons waste zero space. Every millimeter gets used. Most efficient geometric shape in nature.
Your nervous system recognizes that efficiency. Well-executed tessellations trigger a subtle “yes, this is right” response in your brain. Researchers call them natural analogues—human-made patterns echoing nature’s design principles.
I’ve noticed people linger in tessellated rooms longer. They don’t consciously know why the space feels good. It just does.
First tessellation? Buy hexagon tiles or cut cardboard templates. Get your first hexagon perfect. After that, each new piece connects to the previous one at shared edges. I use tape to mark my starting point so alignment stays consistent.
Pattern 4: The Radial Balance (The Focus)
Difficulty Score: 5/10
Definition: Circular pattern where all elements radiate outward from a central point.
Radial patterns pull your eye to center like gravity. They create instant focal points, making them incredibly useful for geometric pattern design for beginners who need to direct attention.
The Concept
Everything radiates from center. Mandalas. Compass roses. Sunburst mirrors. Your eye goes straight to that center point every time.
I use radial patterns strategically. Want someone to look somewhere specific? Put a radial pattern there. Their eyes won’t have a choice.
Application
Radial patterns work best here:
Statement rug in your seating area pulls people into the conversation space. I’ve used this for disconnected furniture arrangements. The radial rug unified everything visually.
Ceiling medallions above dining tables create intimacy. Everyone at the table falls within the pattern’s reach. Subconsciously defines the gathering space.
Accent walls behind beds or sofas establish hierarchy. The radial pattern announces “this is the important wall.”
First radial project? Paint a sunburst on circular wood. Find exact center (measure twice). Draw lines from center to edge at equal intervals—I do every 15 degrees for 24 rays. Paint alternating sections different colors.
Radial patterns command attention automatically. Use that power where you want eyes to land.
Pattern 5: The Fractal (The Restorative)

Difficulty Score: 7/10
Definition: Self-similar patterns where each small part resembles the whole at progressively smaller scales.
Fractals are where parts mirror the whole at different sizes. Most complex pattern for geometric pattern design for beginners, but most rewarding once you get it.
The Concept
Fern fronds look like tiny ferns. Each small section mirrors the whole plant. That’s fractal. For practical design, simplify to two or three scales.
I made my first fractal accidentally. Triangle mountain landscape. Divided each peak into smaller triangles for detail. Stepped back and realized I’d created a fractal. The depth and complexity surprised me.
The Modern Twist
Fractals reduce stress. Not vague feel-good claims—actual measured brain activity changes. Researchers tracked people looking at fractal patterns. The patterns created measurable relaxation responses.
Your brain recognizes the scaling as nature’s design language. Even purely geometric fractals trigger this if you get the scaling right.
First fractal: draw one large triangle. Divide into four smaller triangles. Divide those into four even smaller triangles. You’ve made a two-scale fractal. Add a third scale if you’re ambitious.
People study fractals longer. There’s always another layer to discover. That depth makes the pattern feel naturally restorative.
Getting Started: Your First Pattern Project
Start with linear grid. Master it completely. Move to herringbone when you want more energy.
Tessellation comes third. It teaches precision. You’ll know you’re ready when measurements become automatic.
Radial balance forgives mistakes. Slight imperfections add character. I’ve seen complete beginners make beautiful radial patterns first try.
Save fractals until you’re comfortable with basics. They need planning. But the results justify the effort.
Essential Tools and Materials: Geometric Pattern Design for Beginners
I’ve wasted hundreds on unnecessary tools. Here’s what actually matters:
For hand-drawn patterns:
- Quality ruler (worth the extra $5)
- Basic compass
- Standard protractor
- Mechanical pencils, 0.5mm lead
- Fine-line markers
- Graph paper for practice
For painted patterns:
- Good painter’s tape (prevents bleed)
- Bubble level
- Quality brushes or foam rollers
- Your paint colors
- Primer for furniture
For digital patterns:
- Inkscape (free, start here)
- Adobe Illustrator (upgrade later)
- Graphics tablet (helpful, not essential)
The 12-Week Practice Path: Geometric Pattern Design for Beginners
I built this schedule teaching workshops for five years. It works.
Weeks 1-2: Grid Mastery Fill sketchbooks with grids. Different sizes. Different proportions. Get comfortable with straight lines and equal spacing. Boring? Maybe. Essential? Absolutely.
Weeks 3-4: Grid Variations Turn grids into checkerboards. Try different color combinations. Watch how colors change the pattern’s energy. This is where it gets fun.
Weeks 5-6: Introduction to Angles Add diagonals Practice herringbone on paper before real projects Focus on consistent angles. Inconsistent angles look sloppy. Consistent angles look professional. .
Weeks 7-8: Tessellation Practice First tessellation project. Start with hexagons—easier than they look. Take your time with row one. Rush it and you’ll regret it for every row after.
Weeks 9-10: Radial Symmetry Make radial patterns. Practice finding accurate center points. Work on symmetry as you radiate outward. Center point accuracy determines everything else.
Weeks 11-12: Fractal Complexity Attempt simplified fractals. Two scales minimum. Three if you’re feeling confident. Don’t try four scales your first time. Trust me on this.
Twelve weeks gets you five pattern types and enough experience to start combining them. That’s when geometric pattern design for beginners becomes geometric pattern design, period.
Geometric Pattern Design for Beginners: Common Beginner Mistakes to Avoid
I’ve made every possible mistake. Instead of creating your own, learn from mine.
Starting too ambitious. Don’t attempt fractal tessellations first. Do grids. Master grids. Get bored with grids. Then move on.
Insufficient repetition. Three hexagons isn’t a pattern. It’s three hexagons. Patterns need repetition to register. I aim for minimum 20-30 repetitions.
Trusting your eye. Every wonky pattern I’ve made came from eyeballing instead of measuring. Measure twice. Mark once. Measure again if unsure.
Wrong scale. Once designed tiny herringbone on a 12-foot wall. Looked like visual noise from more than three feet away. Scale patterns to spaces. Small spaces need small patterns. Large spaces need larger units.
Low contrast. Patterns need visual separation. Use contrasting colors or values so eyes can distinguish elements. Low contrast just looks muddy and confusing.
Why This Matters: Geometric Pattern Design for Beginners
Every website uses grids. Every building uses geometric patterns in floors, ceilings, architectural details. Learning geometric pattern design for beginners gives you visual literacy for the designed world.
More than that, it gives you power to shape your spaces intentionally. You stop living with whatever patterns exist. You become someone who creates patterns serving your specific needs.
I’ve watched people transform homes with simple geometric patterns. Grid gallery walls organizing family photos. Herringbone accent walls making cramped rooms feel spacious. Tessellated backsplashes becoming kitchen focal points.
Start with one pattern. Make it yours. Build from there. The geometry’s already around you. Now you’ll know how to use it.
FAQs About Geometric Pattern Design for Beginners
Q: Do I need to be good at math to create geometric patterns?
No. I failed geometry in high school. Still excel at geometric patterns. You need measurement skills and attention to detail, not calculus. Can you use a ruler and maintain consistent spacing? Then you can create beautiful patterns.
Q: What’s the easiest pattern for absolute beginners?
Linear grid. Most forgiving because it only requires straight lines and equal spacing. I still use grids more than any other pattern. They’re versatile and nearly foolproof.
Q: Can I mix different geometric patterns in one project?
Yes, but carefully. Start mixing only two patterns. Make sure they share something—same colors, similar scale, complementary angles. I made a quilt once with five competing patterns. Looked chaotic. Learned that lesson hard.
Q: How do I fix mistakes in painted geometric patterns?
Small errors: tiny brush and matching paint for edge cleanup. Bigger mistakes: wait for complete dry, lightly sand, repaint that section. Quality painter’s tape prevents most mistakes. Worth every penny.
Q: Are digital tools better than hand-drawing for learning patterns?
Hand-drawing teaches fundamentals better. You feel the geometry. Understand spacing intuitively. I still sketch patterns by hand before digital tools. Start pencil and paper. Move to software once you’ve built that foundation.